How to Hide Alert Dialog Never Ask Again in Android
Jetpack Etch is a cracking new declarative UI kit for Android that enables UI creation in Kotlin, replacing cumbersome XML layouts.
This article presents a unproblematic instance using Jetpack Etch in a project and how to create an alert dialog that tin can come in handy when request users to confirm or cancel of import actions.
Tutorial prerequisites
You can follow this tutorial if you already have an XML layout-based Android app and want to start integrating Etch UI elements into it or if you are simply starting a new app and want to build the UI in Compose from the beginning.
To have an optimal feel developing in Jetpack Etch, y'all need Android Studio Arctic Fox, which enables yous to utilise the born preview of the UI you build. It too provides a wizard to easily create a new Compose project.
Creating a new Jetpack Compose app
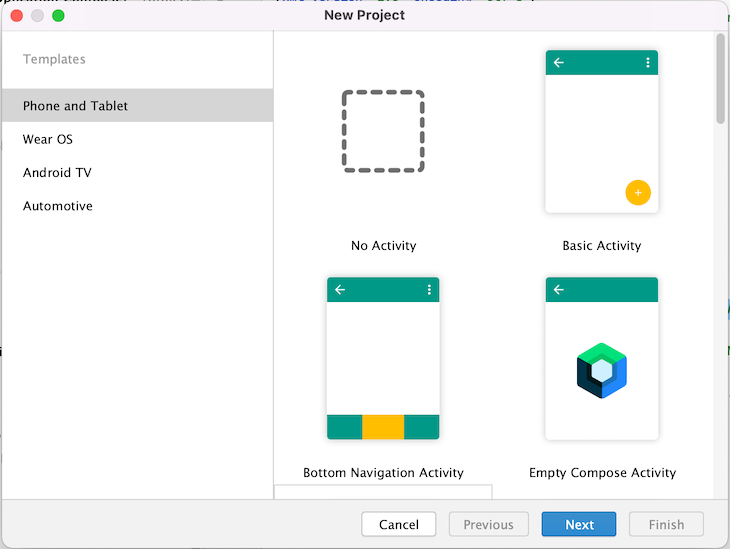
To create a new app, open Android Studio, select File > New > New Project, and in the wizard select Empty Etch Action. And then, click End, and a new Jetpack Compose project will be created.
If yous're completely new to Jetpack Compose, I recommend reading this first-class introductory article. It provides a great overview of bachelor components and describes the principles behind Jetpack Compose. Yet, I volition also explain everything as we go through this article.
This post as well assumes you are familiar with ViewModel (from Android architecture components), and providing the UI country from a ViewModel via StateFlow from Kotlin coroutines.
Adding Jetpack Compose to an existing project
If you lot have an existing Android project, you must add some configuration to use Jetpack Compose.
Setting upwardly the principal project
In your main projection's build.gradle.kts, ensure you have the Android Gradle Plugin 7.0.0 and Kotlin version i.5.31:
buildscript { // ... dependencies { classpath("com.android.tools.build:gradle:seven.0.0") classpath("org.jetbrains.kotlin:kotlin-gradle-plugin:1.five.31") // ... } } Note that because Jetpack Etch uses its ain Kotlin compiler plugin (and their API is currently unstable) it is tightly coupled to a specific Kotlin version. So, you cannot update Kotlin to a newer version unless you likewise update Jetpack Compose to a uniform version.
Setting upwards the app module
In the build.gradle.kts of the actual app module where
android { buildFeatures { compose = true } composeOptions { kotlinCompilerExtensionVersion = "i.0.five" } } Then, you can add the dependencies needed. Notation that compose-theme-adapter has versioning independent from other Compose dependencies (this is but a coincidence that information technology'south likewise on version i.0.five in this instance):
dependencies { val composeVersion = 1.0.v implementation("androidx.etch.ui:ui:$composeVersion") implementation("androidx.etch.ui:ui-tooling:$composeVersion") implementation("androidx.etch.material:material:$composeVersion") implementation("com.google.android.material:etch-theme-adapter:i.0.five") } Their functionality is every bit follows:
-
compose.ui:uiprovides the cadre functionality -
compose.ui:ui-toolingenables preview in the Android Studio -
etch.materialprovides material components similarAlertDialogorTextButton -
compose-theme-adapterprovides a wrapper to reuse an existing material theme for Compose UI elements (defined inthemes.xml)
Creating AlertDialog
Jetpack Etch provides a domain-specific language (DSL) for developing UIs in Kotlin. Every UI element is defined using a function annotated with @Composable, which may or may non take arguments but always returns Unit of measurement.
This means that this function only modifies the UI limerick as a side upshot and doesn't render anything. Past convention, these functions are written starting with a uppercase letter, so it can exist easy to misfile them with classes.
So, let'due south await at the documentation for a cloth AlertDialog composable (I omitted the parameters, which are not needed right now):
@Composable public fun AlertDialog( onDismissRequest: () → Unit, confirmButton: @Composable () → Unit, dismissButton: @Composable (() → Unit of measurement)?, title: @Composable (() → Unit)?, text: @Composable (() → Unit of measurement)?, // ... ): Unit
What we run into at beginning glance is that its parameters are other @Composable functions. This is a common pattern when edifice a UI in Etch: passing simpler composables as arguments to build more complex UI elements.
The AlertDialog parameters that interest united states here are onDismissRequest, confirmButton, dismissButton, title, and text.
With onDismissRequest, we can laissez passer a callback function that should execute when a user taps outside of the dialog or taps the device'due south back button (but non when they click the dialog's Cancel button).
Other parameters are:
-
confirmButton, which is a composable that provides the OK button UI and functionality -
dismissButton, which is the aforementioned for the Abolish push button asconfirmButton -
title, which is a composable that provides the layout for the dialog title
And finally, text is a composable that provides the layout for the dialog message. Note that, although it's named text, it doesn't need to consist of a static text message only.
Considering text takes a @Composable part every bit a parameter, you lot tin provide a more complex layout there as well.
Writing a composable function for AlertDialog
Allow's create a new file in our projection for the alert dialog we want to construct. Allow's telephone call the file SimpleAlertDialog.kt and inside it, let's write a composable function called SimpleAlertDialog().
Inside this office, we'll create the AlertDialog; nosotros'll as well explore the arguments we pass one by one.
Adding an empty onDismissRequest callback
The outset argument is an empty lambda as a callback for the dismiss request (we volition fill it in after):
@Composable fun SimpleAlertDialog() { AlertDialog( onDismissRequest = { }, ) } Adding a Confirm push button
For the Confirm button, allow'south provide a TextButton with the "OK" text and an empty callback. Allow's accept a look at an excerpt from the TextButton documentation (in the code example beneath) to see what a TextButton actually needs (I once again omitted the parameters that are not used):
@Composable public fun TextButton( onClick: () → Unit, // ... content: @Composable RowScope.() → Unit of measurement ): Unit of measurement
This looks unproblematic: a TextButton needs an onClick listener and a content composable as its UI.
However, you cannot simply pass a raw cord to the TextButton to display it; the string must wrap into a Text composable.
Now, we want the push button to display the word "OK." So, the content statement for the Confirm button UI layout will look similar this:
{ Text(text = "OK") } Since the content lambda is the last argument of the TextButton, according to Kotlin convention, we can pull it out of the parentheses.
Subsequently finishing the above steps, the Ostend button added to our AlertDialog looks like this:
@Composable fun SimpleAlertDialog() { AlertDialog( onDismissRequest = { }, confirmButton = { TextButton(onClick = {}) { Text(text = "OK") } }, ) } Adding a Dismiss button
We can now similarly define the dismissButton that will say "Abolish":
@Composable fun SimpleAlertDialog() { AlertDialog( onDismissRequest = { }, confirmButton = { TextButton(onClick = {}) { Text(text = "OK") } }, dismissButton = { TextButton(onClick = {}) { Text(text = "Cancel") } } ) } Adding a title and a message
Let's also add a title and text that will provide our message as simple Text elements. The title will say "Delight confirm" and the message will say "Should I continue with the requested action?":
@Composable fun SimpleAlertDialog() { AlertDialog( onDismissRequest = { }, confirmButton = { TextButton(onClick = {}) { Text(text = "OK") } }, dismissButton = { TextButton(onClick = {}) { Text(text = "Cancel") } }, title = { Text(text = "Please confirm") }, text = { Text(text = "Should I keep with the requested action?") } ) } Calculation AlertDialog to the layout
Our dialog does not still provide any functionality, but let'southward try to see what it looks like on the screen. For that, nosotros must add information technology to our layout. This is washed in two different ways.
Creating a new Jetpack Compose projection from the sorcerer
If yous built a fresh Compose projection using the project wizard, inside the MainActivity.onCreate() method you lot will find a call to setContent{}. This is where all your composables for the screen get.
To add the SimpleAlertDialog composable to your MainActivity just place it inside the MyApplicationTheme (the theme proper name volition be dissimilar if you named your application something other than MyApplication).
Your code should expect as follows:
class MainActivity : ComponentActivity() { override fun onCreate(savedInstanceState: Bundle?) { super.onCreate(savedInstanceState) setContent { MyApplicationTheme { SimpleAlertDialog() } } } } Using an existing XML layout-based project
If you lot take an existing project with an XML-based layout, you must add a ComposeView to your XML layout:
<...>
<androidx.compose.ui.platform.ComposeView android:id="@+id/compose_view" android:layout_width="wrap_content" android:layout_height="wrap_content"/> </...>
Now, in your Activity, you tin access this compose_view, through view bounden, for instance, and information technology will have a setContent{} method where you can prepare all your composables.
Note that for the composables to utilise your existing cloth app theme, yous must wrap them in MdcTheme (the Textile Design components theme wrapper).
So, in your Activity, yous will have something like this:
grade MainActivity : AppCompatActivity() { override fun onCreate(savedInstanceState: Package?) { super.onCreate(savedInstanceState) // Inflate your existing layout as usual, e.g. using view binding val binding = ActivityMainBinding.inflate(layoutInflater) setContentView(binding.root) // Admission the added composeView through view binding and set the content bounden.composeView.setContent { // Wrap all the composables in your app's XML material theme MdcTheme { SimpleAlertDialog() } } } } Testing the app with SampleAlertDialog
Allow'southward run the project and see what we've achieved so far!
The dialog looks as expected, with the title, bulletin, and ii buttons.

However… the alarm cannot be dismissed! It doesn't matter if you lot press the Cancel or OK push button, tap on the screen outside the dialog, or press the device back push button; it doesn't go away.
This is a large change from the one-time XML-based layout arrangement. There, the UI components "took care of themselves" and an AlertDialog automatically disappeared once you tapped 1 of the buttons (or perform another action to dismiss it).
While Jetpack Compose gives you great power, with bully ability comes slap-up responsibleness; y'all have complete control over your UI, but you are also completely responsible for its behavior.
Showing and dismissing the dialog from a ViewModel
To control showing and dismissing the AlertDialog, we will adhere information technology to a ViewModel. While bold you already use ViewModels in your app, if you don't, you lot can easily accommodate the following logic to whatever presentation layer compages yous utilise.
Creating MainViewModel to show/hibernate SimpleAlertDialog
Start, add the following dependency to your build.gradle.kts:
implementation("androidx.lifecycle:lifecycle-viewmodel-ktx:2.4.0") We tin now create a MainViewModel that provides UI state for the MainActivity. Past adding a showDialog property, you can emit the dialog visible/invisible country as a Kotlin coroutine StateFlow containing a Boolean.
A true value means the dialog should be shown; simulated ways it should be hidden.
This showDialog country tin change by the following callbacks:
-
onOpenDialogClicked(), which shows the dialog when required -
onDialogConfirm(), which is called whenever a user presses OK in the dialog -
onDialogDismiss(), which is called whenever a user presses Cancel in the dialog
Permit's see these in action:
form MainViewModel : ViewModel() { // Initial value is false so the dialog is hidden private val _showDialog = MutableStateFlow(false) val showDialog: StateFlow<Boolean> = _showDialog.asStateFlow() fun onOpenDialogClicked() { _showDialog.value = truthful } fun onDialogConfirm() { _showDialog.value = false // Go along with executing the confirmed action } fun onDialogDismiss() { _showDialog.value = false } // The rest of your screen's logic... } Calculation state and callbacks to SimpleAlertDialog
Now nosotros must modify our dialog a little bit. Let's get dorsum to the SimpleAlertDialog.kt file.
There we must make a few changes. Beginning, permit'south add a parameter for the show state to the SimpleAlertDialog() composable role.
Then, inside the function, we can wrap the whole AlertDialog in a big if (show) statement so it only shows when the ViewModel tells it to.
We also demand to add the onConfirm and onDismiss callbacks as parameters to SimpleAlertDialog() so the dialog can communicate back to ViewModel when the user dismissed or confirmed the dialog.
Finally, set the onConfirm callback as the click listener for the OK button and the onDismiss callback as the click listener for the Cancel button and as a callback for the onDismissRequest (a tap exterior the dialog/a press of the device back button).
Birthday information technology looks like this:
@Composable fun SimpleAlertDialog( show: Boolean, onDismiss: () -> Unit, onConfirm: () -> Unit ) { if (show) { AlertDialog( onDismissRequest = onDismiss, confirmButton = { TextButton(onClick = onConfirm) { Text(text = "OK") } }, dismissButton = { TextButton(onClick = onDismiss) { Text(text = "Abolish") } }, championship = { Text(text = "Please confirm") }, text = { Text(text = "Should I continue with the requested action?") } ) } } Attaching SimpleAlertDialog to MainViewModel
Now, we can attach the SimpleAlertDialog to MainViewModel inside our MainActivity and then they can communicate with each other in both directions.
For this, we need iii things. Start, the MainActivity needs a reference to the MainViewModel instance (using the by viewModels() consul).
Secondly, within the setContent scope, we must create a local showDialogState variable and so the SimpleAlertDialog can notice the showDialog state from the viewModel.
We tin do this using the consul syntax (using the by keyword). The delegate and then uses collectAsState() to wrap the showDialog into a special Compose wrapper, Land.
Land is used in Compose to observe changes to the value that is collected inside it. Whenever this value changes, the view is recomposed (that is, all UI elements check if their state changed and if so, they must exist redrawn).
This showDialogState variable can now be passed as an argument to the evidence parameter of the SimpleAlertDialog. If its value changes, the dialog appears or hides accordingly.
However, our SimpleAlertDialog needs two more arguments: the onDismiss and onConfirm callbacks. Hither, we will simply pass the references to the appropriate viewModel methods: viewModel::onDialogDismiss and viewModel::onDialogConfirm.
After finishing the above steps, our MainActivity looks like this:
class MainActivity : ComponentActivity() { // Reference to our MainViewModel example using the delegate private val viewModel: MainViewModel past viewModels() override fun onCreate(savedInstanceState: Bundle?) { super.onCreate(savedInstanceState) // Opens the dialog immediately when the Activeness is created // Of course in a real app you might desire to change information technology viewModel.onOpenDialogClicked() setContent { // Delegate to notice the showDialog state in viewModel val showDialogState: Boolean by viewModel.showDialog.collectAsState() MyApplicationComposeTheme { SimpleAlertDialog( show = showDialogState, onDismiss = viewModel::onDialogDismiss, onConfirm = viewModel::onDialogConfirm ) } } } } Notation that nosotros're calling viewModel.onOpenDialogClicked() in onCreate() here; in a real app, we should call it in response to a user's action, similar pressing a button on the screen.
Testing showing and hiding the SimpleAlertDialog in the app
Let'due south run our app once more. Now, nosotros see that we tin easily dismiss the dialog by pressing the OK or Cancel buttons, tapping anywhere on the screen outside the dialog, or pressing the device dorsum push.
Nosotros also have a confirmation callback in the ViewModel that can keep executing the desired activeness.
Summary
Now yous've experienced how Jetpack Compose'south philosophy is different from the old XML layout-based UI evolution. Compose gives you more control and integration of the UI logic into your ViewModels but also requires you to define all the UI behaviors yourself (fifty-fifty the ones you've taken for granted, like dismissing a dialog).
Nonetheless, having all the logic inside of the ViewModel means y'all can easily write unit tests for it and change it when needed in the future.
The fact that Compose UI elements are implemented as Kotlin functions ways that yous take much less yet readable UI code compared to XML layouts. You too have straight admission to IDE back up while writing code similar code completion, one-push documentation, compile time checks, or blazon safety.
The ability to construct more than circuitous UI elements out of simpler ones by passing composable functions equally arguments to other functions increases code reuse and modularity of your UI.
It tin can as well be easily customizable, for example, in the SimpleAlertDialog, yous tin can add together a parameter to pass a custom layout to edit text instead of the confirmation message, creating a RenameDialog.
LogRocket: Total visibility into your web apps

LogRocket is a frontend application monitoring solution that lets you lot replay bug as if they happened in your own browser. Instead of guessing why errors happen, or asking users for screenshots and log dumps, LogRocket lets you replay the session to quickly understand what went wrong. It works perfectly with whatever app, regardless of framework, and has plugins to log additional context from Redux, Vuex, and @ngrx/store.
In addition to logging Redux deportment and state, LogRocket records console logs, JavaScript errors, stacktraces, network requests/responses with headers + bodies, browser metadata, and custom logs. It also instruments the DOM to record the HTML and CSS on the page, recreating pixel-perfect videos of fifty-fifty the nearly complex unmarried-page and mobile apps.
Try it for costless.
Source: https://blog.logrocket.com/adding-alertdialog-jetpack-compose-android-apps/
0 Response to "How to Hide Alert Dialog Never Ask Again in Android"
Postar um comentário